


|
RULES FOR GOOD PHOTO
COMPOSITION
 A good picture requires a lot of elements,
including an interesting subject, a steady hand, and a good camera,
to name a few. As important as the megapixel rating of your digital
camera, though, is your own ability to apply the rules of
composition to what you see on the LCD display before you press the
shutter release. A good picture requires a lot of elements,
including an interesting subject, a steady hand, and a good camera,
to name a few. As important as the megapixel rating of your digital
camera, though, is your own ability to apply the rules of
composition to what you see on the LCD display before you press the
shutter release.
What does it take to create a good composition? There are just a few
rules, really, that define what most people perceive as a good
photo. By following this advice, you can
dramatically improve all of your photos--from vacation snapshots to
family portraits to your artistic experiments.
Visual Literacy
 Just because you have the latest photo technology and you know how
to use it, doesn’t mean that your photographs are going to be
great—or even good. What you also need is visual literacy—the
ability to see and organize shapes, lines, colors, and textures into
pleasing compositions. And not everyone has it. This ability is what
enables some people to have an artistic eye. But even if you weren’t
born with a visual eye, you can definitely acquire one over time. To
do so, you should study other photographs and even paintings. Focus
on how the photographer or painter used shapes, colors, textures and
line to create a pleasing and often dynamic composition. Soon,
you’ll find yourself see pleasing arrangements all around you. Just because you have the latest photo technology and you know how
to use it, doesn’t mean that your photographs are going to be
great—or even good. What you also need is visual literacy—the
ability to see and organize shapes, lines, colors, and textures into
pleasing compositions. And not everyone has it. This ability is what
enables some people to have an artistic eye. But even if you weren’t
born with a visual eye, you can definitely acquire one over time. To
do so, you should study other photographs and even paintings. Focus
on how the photographer or painter used shapes, colors, textures and
line to create a pleasing and often dynamic composition. Soon,
you’ll find yourself see pleasing arrangements all around you.
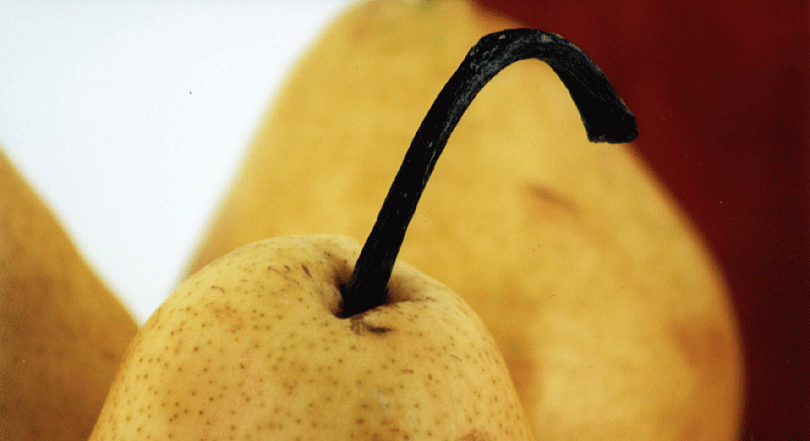
Isolate the Focal Point
 What is the subject of your picture? Always ask yourself that, since
your picture, like a painting or a story, should usually be about
something. It's up to you to decide what story the photo will tell;
give ten people ten cameras and tell them to photograph the same
flower, and you can end up with ten very different images that show
many different aspects of the flower. But remember that a good photo
will emphasize its subject and give it substantially more visual
weight than the other elements in the picture. What is the subject of your picture? Always ask yourself that, since
your picture, like a painting or a story, should usually be about
something. It's up to you to decide what story the photo will tell;
give ten people ten cameras and tell them to photograph the same
flower, and you can end up with ten very different images that show
many different aspects of the flower. But remember that a good photo
will emphasize its subject and give it substantially more visual
weight than the other elements in the picture.
 Imagine a picturesque landscape, for instance. Don't just raise the
camera to your eyes and press the button. Pick something in the
viewfinder and focus on that. Remember that one sprawling landscape
probably looks like every other sprawling landscape; if you don't
pick a focal point, when you look at the image later, you'll wonder
why you thought it was great. Imagine a picturesque landscape, for instance. Don't just raise the
camera to your eyes and press the button. Pick something in the
viewfinder and focus on that. Remember that one sprawling landscape
probably looks like every other sprawling landscape; if you don't
pick a focal point, when you look at the image later, you'll wonder
why you thought it was great.
Last, but not least, remember that the subject of your photo--the
focal point--should be in razor-sharp focus. If your subject is even
a little blurry, you've lost the photo. Digital "film" is cheap; try
taking the photo again. And any portrait photographer will tell you
that when photographing people or animals, it's the eyes that count.
Make sure your camera's auto-focus control locks onto the eyes, not
the nose or cheek.
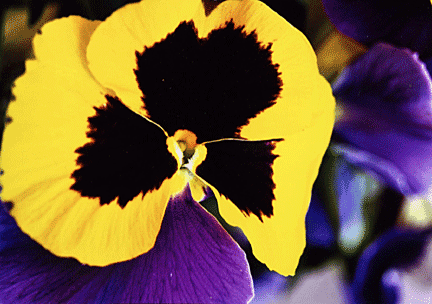
Use the Rule of Thirds
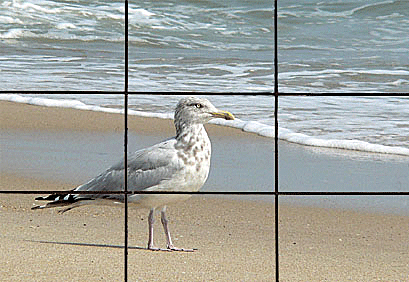 Now
that you're thinking about your photos in terms of a focal point,
you need to decide where to put your subject in the picture. Rarely
will planting the subject dead center in your viewfinder make for a
successful photo. People tend to like seeing the focal point about a
third of the way across the scene. To achieve this, you can mentally
draw two horizontal lines and two vertical lines across the scene,
dividing the picture into nine equal zones. The four points in the
picture where the lines intersect are your sweet spots--put the
subject in any of those places and your image will have a lot more
appeal than if the focal point was in the center. Now
that you're thinking about your photos in terms of a focal point,
you need to decide where to put your subject in the picture. Rarely
will planting the subject dead center in your viewfinder make for a
successful photo. People tend to like seeing the focal point about a
third of the way across the scene. To achieve this, you can mentally
draw two horizontal lines and two vertical lines across the scene,
dividing the picture into nine equal zones. The four points in the
picture where the lines intersect are your sweet spots--put the
subject in any of those places and your image will have a lot more
appeal than if the focal point was in the center.
To get a feel for the rule of thirds, pay attention to videos and
films--you'll find that people are often placed a third of the way
across the screen, not in the center.
Fill the Frame
 Make the most of your frame by filling it as much as possible. If
you're shooting a distant object, zoom in or walk closer. For
example, you think your focal point is a dragonfly on a tree stump,
but the bug is so small that no one can tell it's there. Guess what?
It's not really your focal point. If you simply can't get close
enough to your subject, shoot the picture in the camera's highest
available resolution, zoomed all the way in with the camera's
optical zoom (don't use the digital zoom), and snip away the wasted
space afterwards in an image-editing program. You can probably make
it a much better picture by cropping. Make the most of your frame by filling it as much as possible. If
you're shooting a distant object, zoom in or walk closer. For
example, you think your focal point is a dragonfly on a tree stump,
but the bug is so small that no one can tell it's there. Guess what?
It's not really your focal point. If you simply can't get close
enough to your subject, shoot the picture in the camera's highest
available resolution, zoomed all the way in with the camera's
optical zoom (don't use the digital zoom), and snip away the wasted
space afterwards in an image-editing program. You can probably make
it a much better picture by cropping.
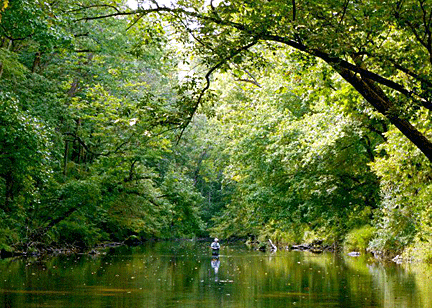
Use Lines as Guides
 I love shooting railroad tracks, long roads that seem to sweep off
to the end of the earth, and long stone walls. That's because I can
use those kinds of elements to lead the viewer through the picture.
Remember how I said that your photos tell a story? Lines like these
are tools you can use to show the viewer where to look. I love shooting railroad tracks, long roads that seem to sweep off
to the end of the earth, and long stone walls. That's because I can
use those kinds of elements to lead the viewer through the picture.
Remember how I said that your photos tell a story? Lines like these
are tools you can use to show the viewer where to look.
Break the Rules
Once you've learned the rules of composition and applied them to
your own photos, be sure to break them once in a while. Sometimes
it's a good idea to put the subject in the middle of the picture,
especially in a perfectly symmetrical composition. You can also make
the focal point blurry, or leave lots of wasted space in a photo.
Photography is all about experimentation—so have fun ignoring the
rules once in a while.
|